Data Driven Design icon

Custom Font Styles in Craft 3 CMS

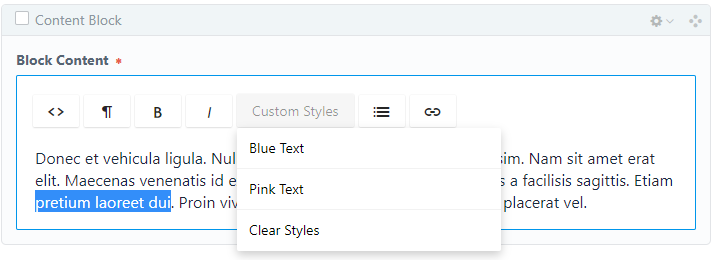
Recently, a customer asked for a site that needed the ability to add custom styling beyond the basics - multiple custom font colors to emphasize specific text on their site. This text and custom styling would be able to be used in the middle of paragraphs of text, removing the option to use a plain text field to individualize colors by inserting them as headlines or other elements that have locked-in control.

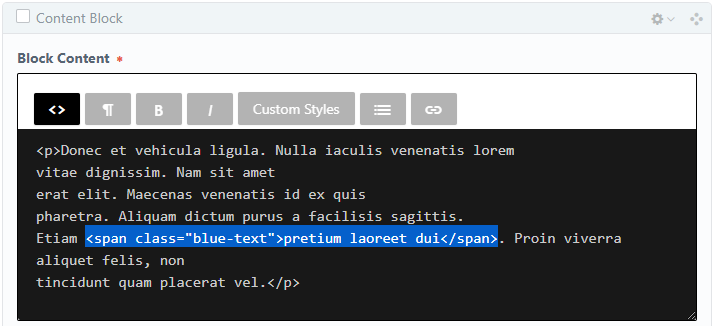
Never having had to do this before, the simplest and most obvious choice was to use the <html> redactor field to add custom classes to spans around the text. This would require a basic level of knowledge about html but also specific knowledge about which classes are set up to add the desired styling. To take this route and provide some clarity to those editing the content, we could add text as instructions to the field if necessary (i.e. "To customize the font colors, add a span around the text to be emphasized and use class 'pink-text' or class 'blue-text' to determine the color of the font. Only these classes have default styles added to them").

<p>Donec et vehicula ligula. Nulla iaculis venenatis lorem <span class="pink-text">vitae dignissim</span>. Nam sit amet erat elit. <span class="blue-text">Maecenas venenatis id ex quis pharetra.</span> Aliquam dictum purus a facilisis sagittis. Etiam pretium laoreet dui. Proin viverra aliquet felis, non tincidunt quam placerat vel.</p>

The problem with this approach is that while it is simple to maintain for someone with a light level of skill in coding, it is not easy for someone without that knowledge. A project manager (before going live) or even the client themselves might need to change this content but lack the background to do it without specific training, or may feel very uncomfortable with this approach.

Instead, with less than 5 minutes of effort, I was able to find a plugin that allows the ability to easily add custom styles to the redactor, a perfect solution for someone with a non-coding background. The benefit to this approach is that it lets anyone edit the content and handles the mark-up in ways that you can define.

First, you'll need to install the plugins:

1. Login to your craft instance's backend and go to the "Plugin Store" link on the left.

2. Search for "redactor."

Custom Font Styles in Craft 3 CMS - search for redactor plugins screenshot

3. Install the Redactor plugin (free; you need this to add custom styles on top of) and the Redactor Custom Styles plugin by clicking on the plugins and then the install button in the pop-up. This may take a minute as they are installed and dependencies are updated.

4. To verify they've been added, go to "Settings" and then "Plugins" and you should see them in the list.

Custom Font Styles in Craft 3 CMS - installed plugins screenshot

Next, you'll go into your code editor and set up the json to add the custom styles:

1. In your editor, create the necessary folder structure directly inside the project by creating a "config" directory, and inside of that new directory, another named "redactor."

2. Then add the json to your config > redactor folder. You can name it whatever you'd like. I tend to name mine Extended.json.

3. In the json below, you will notice that Extended.json has many of the typical redactor buttons defined, then the customstyles plugin. Inside the custom styles json object, I've defined a dropdown menu with my two desired styles. Each is inside of a span tag and will apply the class "blue-text" or "pink-text." I've made these toggles, but also included a button to clear the formatting.

4. Check for errors and push your changes.

{
  "buttons": ["html", "format", "bold", "italic", "lists", "link"],
  "plugins": ["customstyles"],
  "customStyles": {
    "customStyles": {
      "dropdown": {
        "blueText": {
          "args": {
            "tag": "span",
            "class": "blue-text",
            "type": "toggle"
          }
        },
        "pinkText": {
          "args": {
            "tag": "span",
            "class": "pink-text",
            "type": "toggle"
          }
        },
        "clearStyles": {
          "api": "module.inline.clearformat"
        }
      }
    }
  }
}

Finally, you'll need to configure Craft to use your custom styles:

1. Simply go to the "Settings" section of the site in the admin panel, and then the "Fields" area. Select the field you want to apply this to, and then select "Extended" from the Redactor Config dropdown.

Custom Font Styles in Craft 3 CMS - redactor field configuration screenshot

2. Save your config, and then go to the entry where you should now see the new options displayed in a "Custom Styles" dropdown. Incidentally, you can name this "fontColors" by modifying the json object and it will display as "Font Colors."

3. Highlight the text you want to change the color of, and apply styles using the dropdown.

Custom Font Styles in Craft 3 CMS - dropdown with custom styles

4. Check your work by clicking on the <> (html) button to check that the code is applied as desired.

Custom Font Styles in Craft 3 CMS - verify work screenshot

5. Then save your changes and check the frontend of the site or live preview to verify that any css styles are being applied appropriately.

The Redactor Custom Styles plugin is capable of so many more customizations, so if you're curious or need broader solution, feel free to check out their documentation, which is linked to from the "Plugins" section of the admin panel. They provide a handy Example.json to show you the variety of options available for use in your custom styles.

Get In Touch.
Contact